

What To Do When The Register Has Already Been Opened And You Have To Change Sale
viii Annals Open and Close
Open up the register to ring sales. Close the register to reconcile the cash drawer and to lock the register from farther sales.
Note:
Due to the numerous arrangement configuration options available, menu options are not identified by a function fundamental number (F2, F3, then on). Instead, the name on the button is used throughout this guide.This chapter contains the following sections:
-
Accessing the Back Office Register Open/Shut Functions
-
Closing the Annals
-
Standard Shut
-
Cash Drawer Shut
-
-
Forcing a Annals to Close
-
Print Till Summary Receipt
-
Opening the Annals
-
Standard Open
-
Cash Drawer Open
-
-
Changing Business Date
Accessing the Back Office Annals Open up/Shut Functions
-
Later logging into the Back Function (see Accessing the Dorsum Office), select the Open/ Close Options card option within Till and press Enter.
Tip:
You can also press the number/letter associated with the menu option on the keyboard to admission the open and close functions.
-
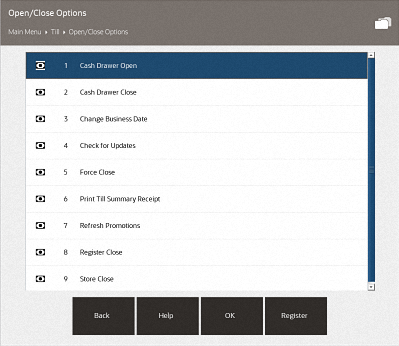
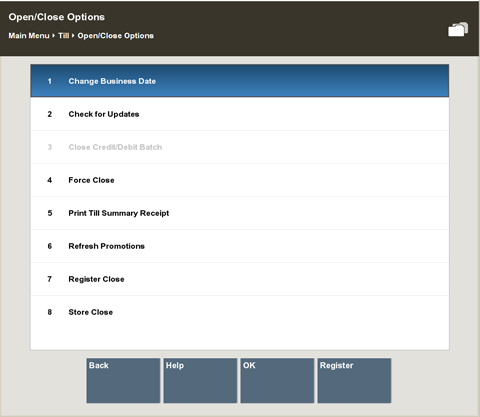
Select an option from the Open up/Shut Options menu and press Enter.
Figure eight-1 Open/Close Options Carte
Annotation:
The Register Close and Store Close menu options toggle between open up and shut. In Figure eight-ane to a higher place, notation that the register menu option is Register Close. This indicates that the register is opened. The Shop Close option tells you that the shop is currently open up.
-
To close the register, select the Annals Close selection. See Closing the Annals.
-
To open the register, select the Register Open up choice. Run across Opening the Register.
-
To print a till summary receipt, select the Print Till Summary Receipt option. See Print Till Summary Receipt.
-
Closing the Register
The register shut process can be performed by store managers or associates who have the proper security privileges. A annals close can exist completed whatsoever time during the solar day.
This process is highly configurable and your process may be dissimilar than the instructions below. Every try has been fabricated to include notes or examples of additional steps that may be configured for your store.
The procedures described in this section assume that till accountability is not beingness used (this is a configurable option). For more information on till accountability and its requirements see the affiliate, Till Management.
The register closing process depends upon whether your organization is configured for standard opening and closing, or 24/7 trading:
-
Standard Shut shut procedure.
-
24/seven Store Environment trading close process.
-
Cash Drawer Close shut process.
Standard Shut
Note:
The open up/shut instructions beneath include the counting of tills to testify all steps to shut the annals. Refer to the Till Options chapter in the Oracle Retail Xstore Bespeak of Service User Guide for more information.-
From the register to exist closed, select the Back Function option on the menu. Follow any prompts to log in to the Back Office as required.
-
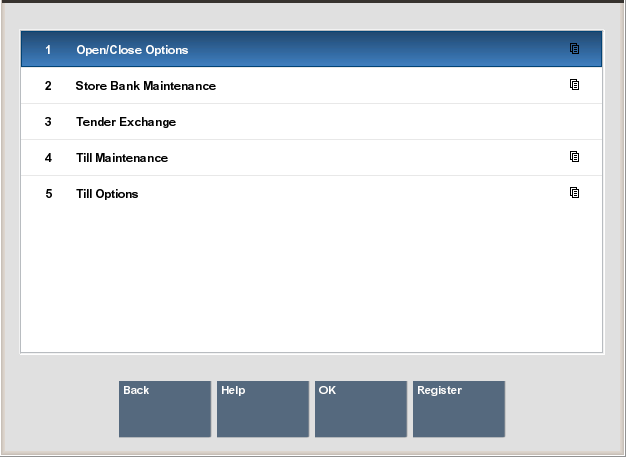
At the Till menu, use the up and down arrow keys to select Open up/Close Options and press Enter, or press the number associated with the menu option on the keyboard.
Figure 8-ii Till Menu - Open/Shut Options
-
Oracle Retail Xstore Betoken of Service displays the Open/ Shut Options menu. Select the Register Shut option and press Enter, or press the number associated with the carte du jour option on the keyboard.
Figure 8-3 Register Close Option

Important:
Note that the Register option toggles between open up and close. If the option is Register Shut, the register is currently open. If the selection is Register Open, the annals is currently closed.
-
Oracle Retail Xstore Point of Service displays a confirmation prompt: Do y'all want to close this annals? Printing Aye to shut the register.
Annotation:
Pressing No at the Register Shut confirmation prompt cancels the annals close process and returns you lot to the Open/Close Options menu.
-
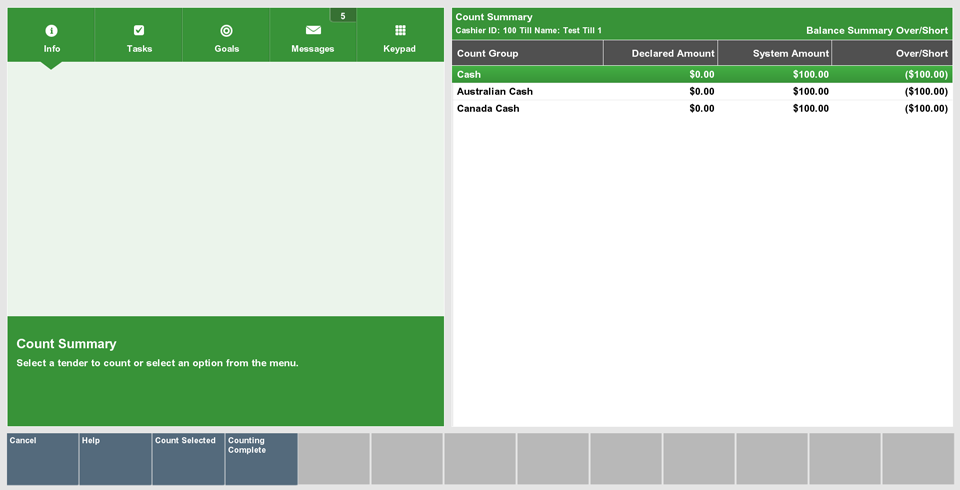
The cash drawer opens and Oracle Retail Xstore Point of Service displays the Close Count Summary screen. Each count group (tender type) is counted individually. Specific groups require additional information as determined by the home part. Select the tender type to exist counted and and so select the Count Selected option to display the tender grouping'southward count screen.
Figure eight-4 Shut Count Summary Screen
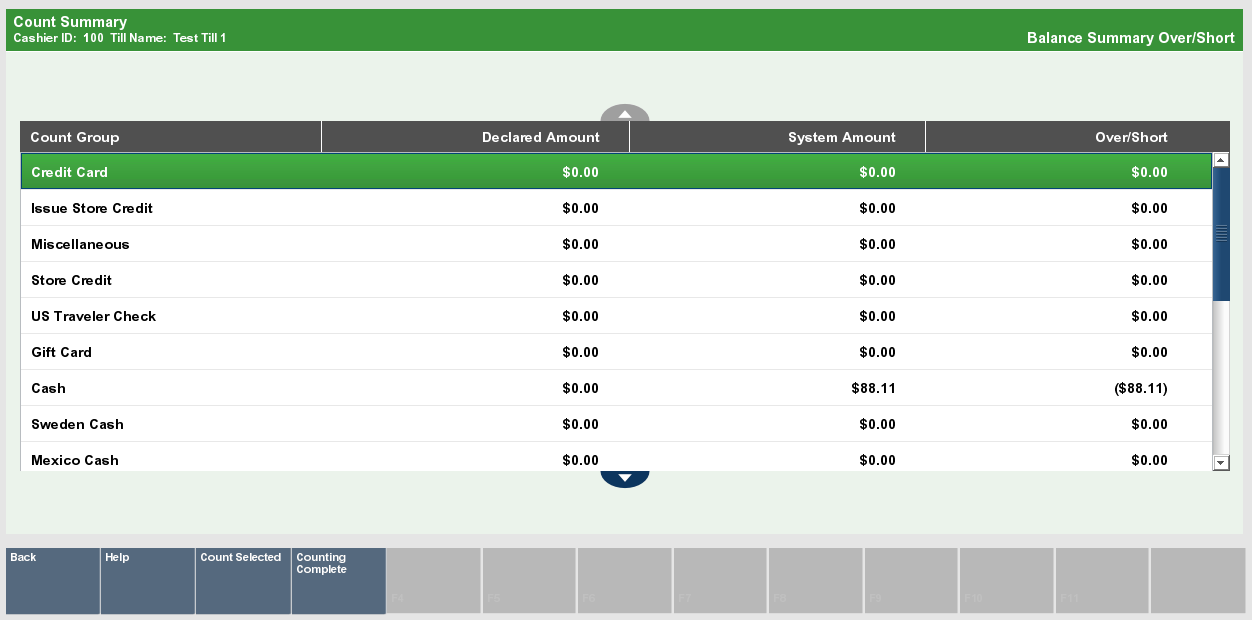
Notation:
Depending upon the configuration of your organisation and your shop policy, the over/short amounts as shown higher up may not be displayed.
-
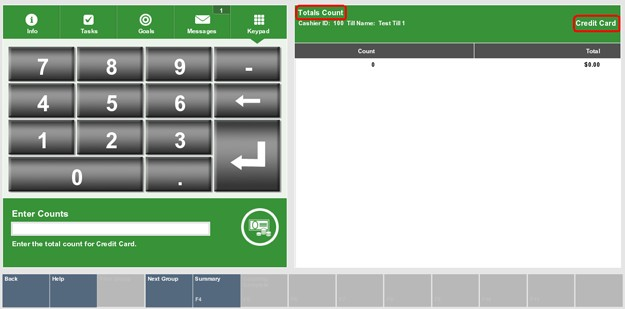
Enter each value as required in the focus bar and press Enter. The tender blazon you select and your system's configuration determine the type of count you must perform. The following table shows Xstore base examples.
Tabular array 8-i Tender Count Screen Xstore Base Examples - Standard
Tender Count Example Credit Bill of fare
(Totals Count)
The focus bar prompts to enter the Count and and then the Amount.
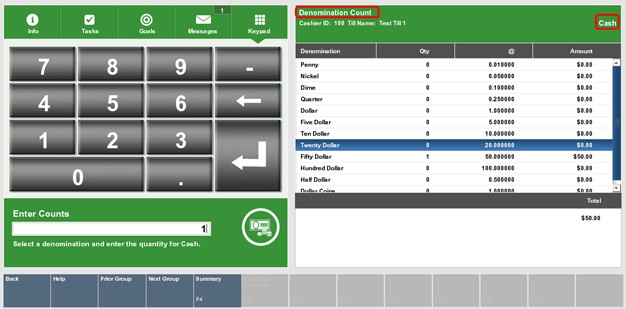
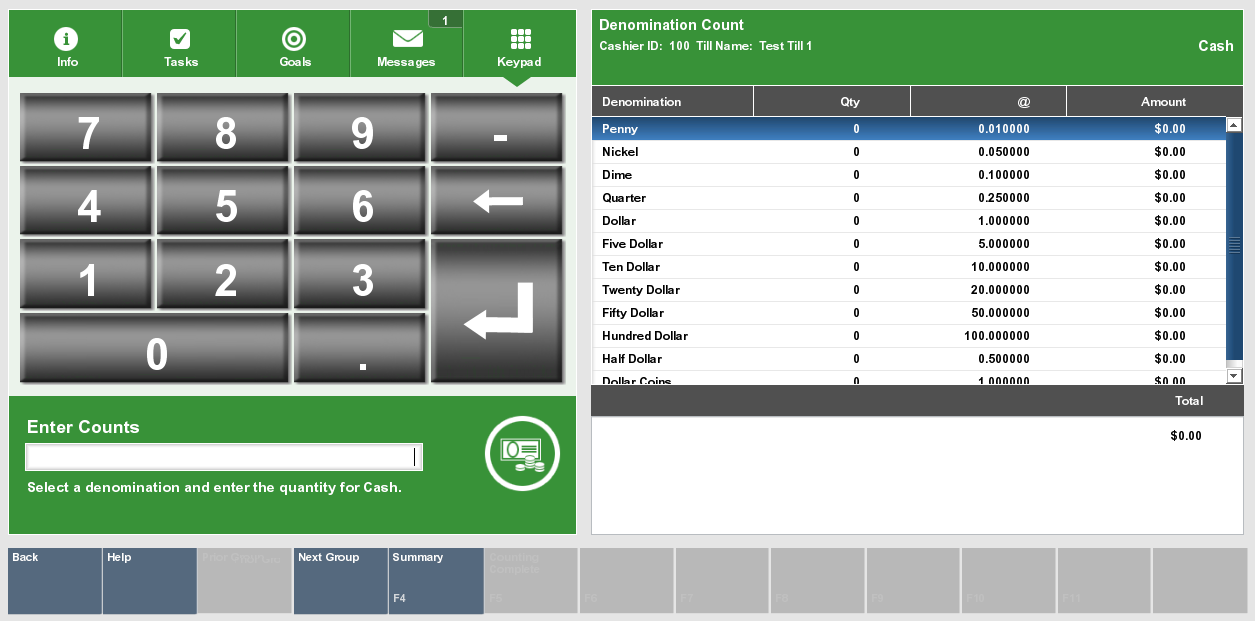
Cash (Denomination Count)
The focus bar prompts to enter the Count for each denomination. In the instance below, the Fifty dollar denomination is being counted. Once Enter is pressed, the arrangement highlights the adjacent denomination in the count. The amount is calculated based on the quantity entered and displays a running total at the bottom of the screen.
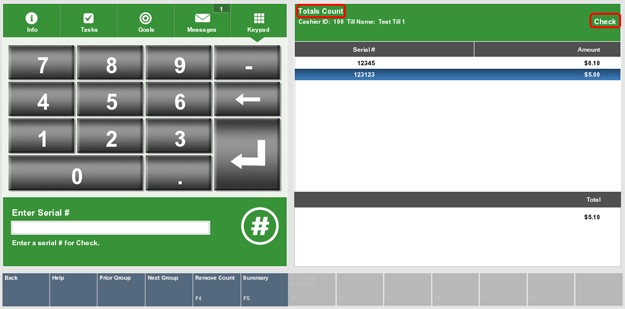
Cheque (Totals Count)
The focus bar prompts to enter the Serial # and then the Amount. The organisation calculates the amount based on the quantity entered and displays a running total at the bottom of the screen.
Notation:
A Totals Count prompts for a total number of the tender type and the total corporeality.A Denomination Count requires that you specify the number of items (Count) and the value of each item in the tender group (Amount) that yous selected.
Tip:
The type of count is labeled on the upper left portion of the count screen view port. The tender type is identified in the upper right portion of the count screen view port.
-
Select Next Group to display the next count screen.
Annotation:
Select Prior Group to go back to the previous count screen.
-
Repeat steps vi-vii until all tenders are counted. Select Summary to return to the Count Summary screen.
-
Review the amounts. If the totals are correct, select the Counting Consummate button.
Note:
Check the Over/Brusque cavalcade to come across if your till is balanced with the system values for each tender blazon. To change counts run into Editing Tender Group Counts.
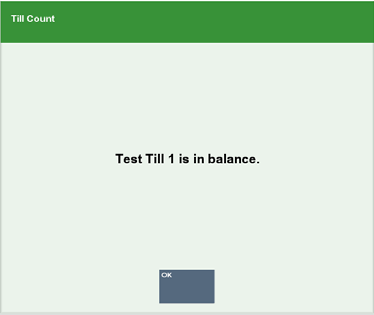
If the till is in balance, a confirmation message displays. Press Enter to go along the register shut.
Figure 8-5 Till in Balance
-
If any tenders are out of balance-your counts do non match the system expected amounts-Xstore displays a list of tenders that are out of remainder.
Figure viii-six Tenders Out of Balance Prompt

-
Select Yep to have your counted amounts. If prompted, select a reason for the count discrepancy and/or type a comment about the discrepancy.
<OR>
-
Select No to recount any tenders as needed. Oracle Retail Xstore Point of Service re-displays the Shut Count screen where you lot can make your changes every bit needed. Run across Editing Tender Group Counts.
-
-
Depending upon your system's configuration, you may be prompted with the suggested deposit amount.
-
Select Accept Eolith to confirm the amount to exist deposited and go to footstep 12.
-
Select Change Deposit to enter an amount to be deposited:
-
Y'all are prompted to enter the corporeality to be deposited. Enter the corporeality and printing Enter to continue the register close.
Tip:
You can select the Deposit Calculator option to display a denomination count screen that can be used every bit a calculator-showing a running total at the bottom of the screen as you count the greenbacks amount to be deposited.
-
-
-
The system may be configured to print a Airtight Count receipt and a Register Closed receipt.
Close the greenbacks drawer and the system closes the register.
Editing Tender Group Counts
If a tender group is out of balance, you can recount an individual tender group and edit the original count you entered into the system.
-
At the Count Summary screen (Effigy 8-4), select the tender group that must exist recounted and select the Count Selected option to display the tender group count screen.
-
Recount the tender and enter the new count values. Most tenders allow you to override the denomination count by selecting the row and then adding values into the focus bar prompts. When you press Enter the count value changes. For checks, however, you must select the Remove Count push to delete the row and and then re- enter the Serial # and Amount.
Figure 8-7 Remove Count Choice

-
Select the Summary pick to view the changes and return to the Tender Group Summary screen.
-
Echo steps one-3 for each tender group that is non balanced. When you lot have completed editing the tender groups, select the Counting Consummate option. If there are tender groups that are notwithstanding out of balance, a screen displays prompting whether you want to recount the tenders or take the count and go along with the register close procedure.
-
Depending upon your organisation's configuration, you may be prompted with the suggested deposit amount. See stride 10 to complete the register close process.
Greenbacks Drawer Close
If your system is configured to use networked greenbacks drawers, closing the annals is done by endmost the cash drawer.
Yous must remove the till earlier closing the cash drawer. See Removing a Greenbacks Drawer Till for more than information.
To shut the cash drawer:
-
In the Back Office carte, select Open/Shut Options.
Figure viii-viii Open up/Close Options - Register Close
-
Select Cash Drawer Close. A list of open cash drawers displays.
-
Select the drawer to shut.
-
Select OK. A confirmation prompt opens.
-
Select Aye.
-
The physical cash drawer opens and Oracle Retail Xstore Point of Service displays the Close Count Summary screen. Each count group (tender type) is counted individually. Specific groups require additional information as adamant by the home office. Select the tender type to exist counted and then select the Count Selected selection to display the tender group's count screen.
Figure viii-nine Close Count Summary Screen
Note:
Depending upon the configuration of your system and your store policy, the over/brusque amounts as shown in a higher place may non be displayed.
-
Enter each value as required in the focus bar and press Enter. The tender type you select and your system's configuration make up one's mind the type of count you must perform. The post-obit table shows Xstore base examples.
Table 8-2 Tender Count Screen Xstore Base Examples - Cash Drawer
Tender Count Example Credit Carte du jour
(Totals Count)
The focus bar prompts to enter the Count and then the Amount.
Greenbacks (Denomination Count)
The focus bar prompts to enter the Count for each denomination. In the example below, the Fifty dollar denomination is being counted. Once Enter is pressed, the system highlights the next denomination in the count. The amount is calculated based on the quantity entered and displays a running total at the bottom of the screen.
Check (Totals Count)
The focus bar prompts to enter the Serial # and then the Amount. The system calculates the amount based on the quantity entered and displays a running total at the bottom of the screen.
Notation:
A Totals Count prompts for a total number of the tender blazon and the full corporeality.A Denomination Count requires that y'all specify the number of items (Count) and the value of each item in the tender grouping (Corporeality) that you lot selected.
Tip:
The type of count is labeled on the upper left portion of the count screen view port. The tender type is identified in the upper right portion of the count screen view port.
-
Select Next Grouping to display the next count screen.
Tip:
Select Prior Grouping to go back to the previous count screen.
-
Repeat steps 6-7 until all tenders are counted. Select Summary to return to the Count Summary screen.
-
Review the amounts. If the totals are correct, select the Counting Complete button.
Tip:
Cheque the Over/Brusk column to see if your till is balanced with the system values for each tender type. To modify counts see Editing Tender Group Counts.
If the till is in residuum, a confirmation message displays. Press Enter to go on the cash drawer close.
Effigy 8-10 Till in Balance
-
If any tenders are out of balance-your counts do not match the system expected amounts-Xstore displays a list of tenders that are out of balance.
Figure viii-eleven Tenders Out of Balance Prompt
-
Select Yes to accept your counted amounts. If prompted, select a reason for the count discrepancy and/or type a annotate about the discrepancy.
<OR>
-
Select No to recount any tenders as needed. Oracle Retail Xstore Bespeak of Service re-displays the Close Count screen where yous tin make your changes equally needed. See Editing Tender Group Counts.
-
-
Depending upon your arrangement's configuration, you may exist prompted with the suggested deposit corporeality.
-
Select Accept Deposit to ostend the amount to exist deposited and go to step 12.
-
Select Alter Deposit to enter an amount to exist deposited:
-
You are prompted to enter the corporeality to be deposited.
-
Enter the corporeality and press Enter to go along the cash drawer close.
Note:
You tin select the Deposit Calculator selection to display a denomination count screen that can exist used equally a calculator-showing a running total at the bottom of the screen as y'all count the cash corporeality to exist deposited.
-
-
-
The organisation may exist configured to print a Closed Count receipt and a Cash Drawer Closed receipt.
Figure viii-12 End Count Eolith Receipt Sample
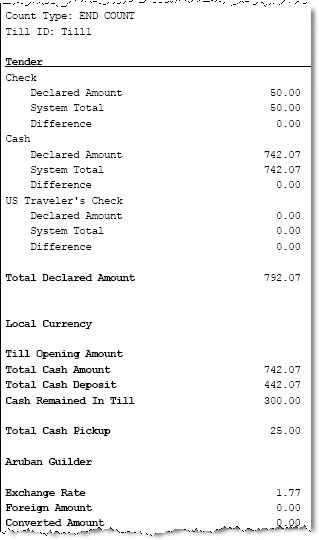
Figure 8-13 Close Receipt Sample
-
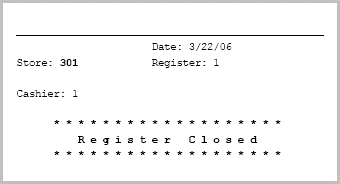
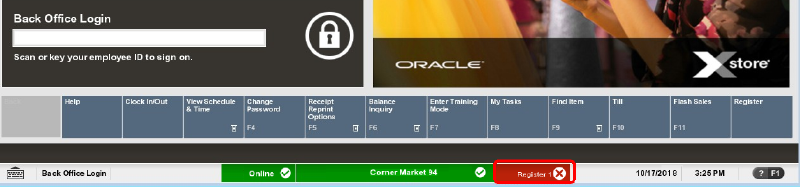
Close the physical cash drawer to complete the shut process. This register is now closed as indicated by the Register indicator color change (from green to red).
Figure eight-fourteen Back Office View - Register Closed
Note:
If configured, you tin can still access functions that do not crave a till such as Clock In and Clock Out, Detail Lookup, and View Timecard even though the register is closed for auction transactions.
Forcing a Register to Close
If register equipment fails for whatsoever reason and a register cannot exist airtight using the normal procedure, the Force Close pick may be used. By forcing a annals to close, despite equipment failure, the store closing process may then be started.
-
At the Back Office Main Bill of fare, select Open/Close Options press Enter.
-
Select Force Close printing Enter.
Oracle Retail Xstore Betoken of Service displays a list of whatever open registers (if no registers are nonetheless open, Oracle Retail Xstore Signal of Service displays a bulletin).
-
Select the annals that you want to close from the listing. Use the up and down pointer keys to go to the register y'all want to close, and press Spacebar to select it. Press Enter to continue.
Oracle Retail Xstore Point of Service displays a bulletin indicating that the register has been forced to close.
Print Till Summary Receipt
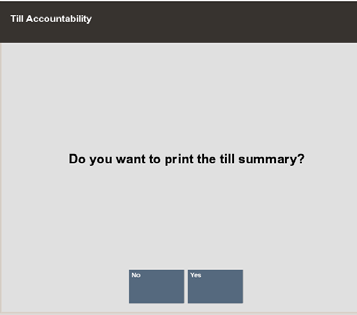
This selection allows you lot to print a summary recorded during the last till count.
-
At the Back Office Primary Menu, select Open/Close Options press Enter.
-
Select Print Till Summary Receipt.
-
When prompted, select Yeah to print the receipt. The system prints the till summary for the register to a receipt printer. The receipt includes a breakup of the various tenders (quantity and amount), a configurable list of various transactions that occurred at the annals (/paid out, returns, refunds, discounts, account setups, etc., and the quantity and amount for each), and taxes.
Figure 8-15 Till Summary Receipt Prompt
Opening the Annals
Opening the register is a process that can be apace completed past managers or associates who take the proper security privileges. The process is highly configurable and your process may exist dissimilar from the instructions below. Every effort has been made to include notes or examples of additional steps that may be configured for your store.
The annals open process depends upon whether your register is configured for a standard open and close process, or if it is configured for 24/seven processing.
-
Standard Open up open process.
-
24/7 Store Surroundings trading open procedure.
Standard Open up
-
After logging on at the Back Office (encounter Accessing the Back Part), select the Open up/Close Options from the Master Card then printing Enter.
Notation:
Touch-screen users tap the register status bar to open up the register. The focus bar prompts for your employee ID and password. Enter the information when prompted. Continue to step iii.
Figure viii-sixteen Back Office - Annals Closed
-
Select the Register Open option and press Enter, or press the number associated with the menu choice on the keyboard.
Effigy 8-17 Open/Shut Options - Annals Close
Note:
The Register menu choice toggles between open up and close. If the available menu option is Register Shut, the register is currently open. If the available menu choice is Register Open, the register is currently closed.
-
Oracle Retail Xstore Betoken of Service prompts: Practice you want to open this register? Press Yes to open up this register.
Depending upon the configuration of your system, yous may be prompted to perform an opening count. Refer to To Perform a Begin Count for procedural data.
If your annals has more than than one greenbacks drawer, yous are prompted to select the drawer from a list of available cash drawers and attach the till before performing an opening count. Refer to Till Management for more data.
If you are not prompted to count the till, the register is opened at this time.
To Perform a Brainstorm Count
-
Afterwards confirming that you want to open the register, the Count Summary screen displays, select the tender blazon to be counted and so select the Count Selected push to brandish the tender group'south count screen.
Figure 8-18 Begin Count Summary Screen
-
Enter each value as required in the focus bar and printing Enter. Xstore will highlight the next denomination in the list.
Notation:
Depending upon the configuration of your system, you may be prompted to enter the total opening amount rather than prompted to count by denomination. See Tender Count Screen Xstore Base of operations Examples - Standard
Figure eight-xix Denominations Count - Greenbacks
-
Select Side by side Grouping until all tenders are counted.
Tip:
Select Prior Group to become back to the previous count screen.
-
Repeat steps 2-three until all tenders are counted and then select Summary to return to the Count Summary screen.
-
Review the amounts. If the totals are correct, select the Counting Complete button.
Tip:
Check the Over/Short column to see if your till is counterbalanced with the organisation values for each tender type.
-
If the starting greenbacks corporeality matches, the system prompts to confirm the amount for all greenbacks currencies you entered and opens the annals after you acknowledge the arrangement corporeality.:
Figure 8-20 Verify Begin Count Prompt
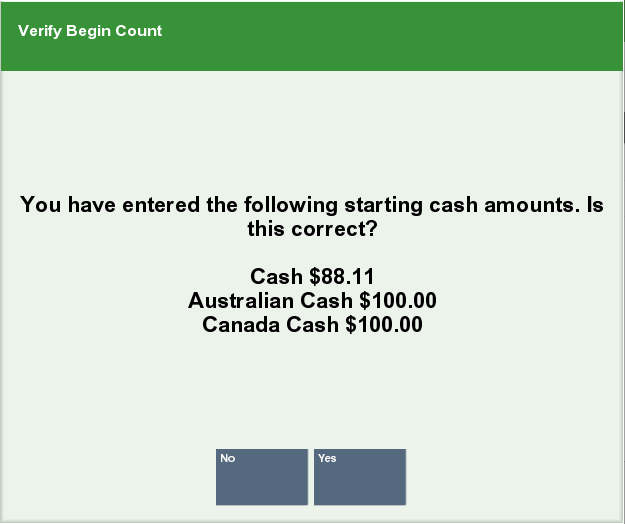
-
Select Yeah if the corporeality is correct.
-
Select No to recount the starting amount.
If configured, the system prints a Begin Count receipt showing the amount of starting cash in the till and signature lines for the cashier and manager to sign confirming this open amount.
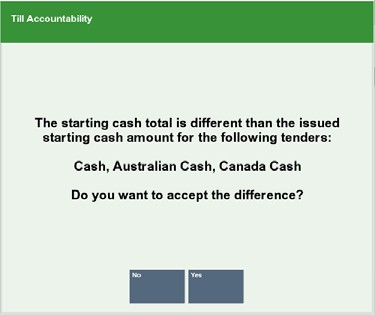
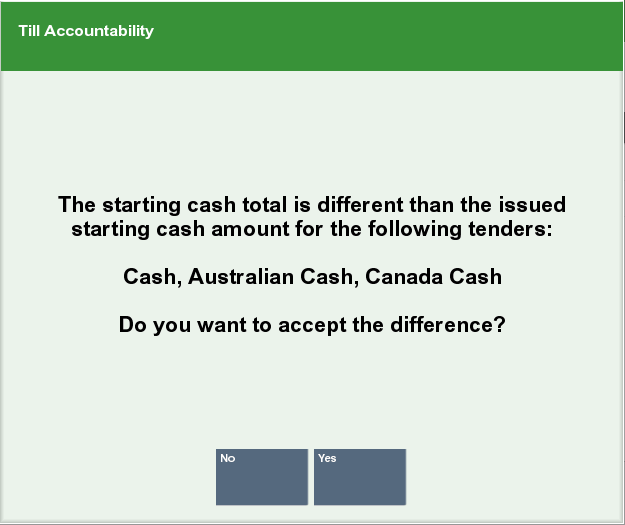
If the currency amounts practise not match, the organization displays a prompt to either recount the till or to accept the difference:.
Figure eight-21 Recount or Accept Departure Prompt
-
Press Y to take the corporeality you counted and keep opening the register. Yous are prompted to enter/select the reason for the discrepancy between the counted amount and the expected amount. You may be required to enter a comment so press Enter.
<OR>
-
Press Northward to recount the till.
If y'all counted the till from the Back Office, select the Register choice to display the register screen. The register is now open and a till has been counted and fastened to the current register. The system may impress a receipt indicating the register number that is open and the cashier ID who is at the register.
Effigy eight-22 Register Open up Receipt

-
Greenbacks Drawer Open
If your system is configured to utilise networked greenbacks drawers, opening the register is done past opening the cash drawer. Any register's back office can be used to open the networked cash drawers. If in that location are no bachelor networked greenbacks drawers to open the Cash Drawer Open push button is disabled.
To open up the cash drawer:
-
In the Dorsum Role menu, select Open/Close Options.
Effigy 8-23 Open up/Close Options Menu
-
Select Cash Drawer Open. A list of available networked cash drawers opens.
-
Select the drawer to open up.
-
Select OK. A confirmation prompt opens.
-
Select Yeah. A list of tills opens.
-
Select the till to utilise.
-
Select OK.
-
The Count Summary screen displays, select the tender blazon to exist counted and then select the Count Selected button to brandish the tender group's count screen.
Figure 8-24 Begin Count Summary Screen
-
Enter each value equally required in the focus bar of the count screen and press Enter. Xstore volition highlight the side by side denomination in the list.
Annotation:
Depending upon the configuration of your system, you may be prompted to enter the total opening corporeality rather than prompted to count past denomination. Run across Tender Count Screen Xstore Base Examples - Cash Drawer.
Figure 8-25 Denomination Count - Cash
-
Select Adjacent Group to brandish the next count screen.
-
Repeat steps ix-10 until all tenders are counted so select Summary to return to the Count Summary screen.
-
Review the amounts. If the totals are correct, select the Counting Complete button.
Tip:
Bank check the Over/Short column to come across if your till is counterbalanced with the system values for each tender type. To modify counts see Editing Tender Grouping Counts.
-
If the starting cash amount matches, the system prompts to confirm the amount for all cash currencies you entered and opens the greenbacks drawer after you admit the system amount.
Effigy eight-26 Verify Begin Count Prompt
If configured, the arrangement prints a Begin Count receipt showing the amount of starting cash in the till and signature lines for the cashier and manager to sign confirming this open up amount.
-
If the currency amounts exercise non match, the system displays a prompt to either recount the till or to accept the difference:
Figure viii-27 Starting Cash Difference Prompt
-
Printing Y to accept the amount you counted and proceed opening the cash drawer. You are prompted to enter/select the reason for the discrepancy between the counted corporeality and the expected corporeality. You may exist required to enter a comment so press Enter.
<OR>
-
Printing N to recount the till.
-
-
Open up the till to associate with the Cash Drawer. Come across Open a Till- Cash Drawer in the Oracle Retail Xstore Point of Service User Guide for more information.
-
If yous counted the till from the Back Role, select the Register option to display the register screen. The register is at present open and a till has been counted and fastened to the electric current register. The system may print a receipt indicating the register number that is open and the cashier ID who is at the register.
Irresolute Business concern Appointment
The Modify Business Date option can exist used in a non 24/7 store if the system is configured to prompt to enter the business appointment when opening the shop. If you enter the business date, just you desire to alter it, prior to entering any opening counts, y'all can employ this option to change the appointment.
The business engagement may be changed if a retailer may have incorrectly entered the business engagement during the store open procedure or in the event the retailer had to close and reopen the shop in the middle of the day. The system automatically moves to the next date and then the concern date would not equal the system engagement.
To change the Business concern appointment:
-
At the Till bill of fare, select Change Business organization Date, or press the number associated with the carte option on the keyboard.
-
Enter the date required.

What To Do When The Register Has Already Been Opened And You Have To Change Sale,
Source: https://docs.oracle.com/cd/E62106_01/xpos/pdf/200/html/managers_guide/register_open_close.htm
Posted by: whitehatian.blogspot.com
0 Response to "What To Do When The Register Has Already Been Opened And You Have To Change Sale"
Post a Comment